วันอังคารที่ 28 สิงหาคม พ.ศ. 2561

งานปฏิบัติที่ 9 งานโปรแกรมควบคุม Buzzer ร่วมกับ Keypad

รูปที่ 8.1 แสดงการออกแบบวงจรควบคุม Buzzer ร่วมกับ Keypad
โค้ดที่8.1 (Code Arduino)
#include "LedControl.h"
#include "Keypad.h"
#define C4  262
#define D4  294
#define E4  330
#define F4  349
#define G4  392
#define A4  440
#define B4  494
#define C5  523
char keys[4][4]={
  {7,8,9,0},
  {4,5,6,0},
  {1,2,3,0},
  {0,0,0,0}};
byte rowPins[] = {7,6,5,4};
byte colPins[] = {3,2,1,0};
Keypad keypad = Keypad(makeKeymap(keys),rowPins,colPins,4,4);
int melody[] = {C4,D4,E4,F4,G4,A4,B4,C5};
int dl = 300;
int buzzerpin = 11;
LedControl lc=LedControl(8,10,9,1); 
// Pin 8->DIN, 10->CLK, 9->CS(LOAD), 1 = No.of devices
void setup() 
{
  lc.shutdown(0,false);  
  lc.setIntensity(0,5); 
  lc.clearDisplay(0);
  pinMode(buzzerpin,OUTPUT);
  digitalWrite(buzzerpin,HIGH);
}
void loop() 
{
  char key = keypad.getKey();
  if ((key != NO_KEY) && (key < 9))
  {
    lc.setDigit(0,0,key,false);
    tone(buzzerpin, melody[key-1],dl);
    delay(dl);
    digitalWrite(buzzerpin,HIGH);
  }
}


โค้ดที่8.2 (Code Arduino)
#include "LedControl.h"
#include "Keypad.h"
#define A3  220
#define B3  247
#define C4  262
#define D4  294
#define E4  330
#define F4  349
#define G4  392
#define A4  440
#define ST  0
int melody[] = {G4,G4,G4,G4,G4,G4,E4,D4,E4,G4,C4,G4,E4,
D4,E4,C4,D4,C4,A3,C4,C4,C4,A3,C4,ST,C4,A3,C4,C4,C4,A3,
C4,ST,G4,A4,G4,E4,D4,C4,ST};
float beats[] ={0.5,0.5,0.5,0.5,1.5,0.5,0.5,0.5,0.5,0.5,
1.5,0.5,0.5,0.5,0.5,0.5,0.5,0.5,0.5,0.5,0.5,0.5,0.5,0.5,
0.5,0.5,0.5,0.5,0.5,0.5,0.5,0.5,0.5,0.5,0.5,0.5,1,1,1,1};
int buzzerpin = 11;
int timestop = 70;
char keys[4][4]={
  {'7','8','9','0'},
  {'4','5','6','0'},
  {'1','2','3','0'},
  {'0','0','0','0'}};
byte rowPins[] = {7,6,5,4};
byte colPins[] = {3,2,1,0};
Keypad keypad = Keypad(makeKeymap(keys),rowPins,colPins,4,4);
LedControl lc=LedControl(8,10,9,1); 
// Pin 8->DIN, 10->CLK, 9->CS(LOAD), 1 = No.of devices
int m=1;
int num[2]; //num[0] to num[1]
char number;
int pw;
void setup() 
{
  lc.shutdown(0,false);  
  lc.setIntensity(0,5); 
  lc.clearDisplay(0);    
  pinMode(buzzerpin,OUTPUT);
  digitalWrite(buzzerpin,HIGH);
  randomSeed(analogRead(0));
  pw = random(100);
}
void loop() 
{
  char key = keypad.getKey();
  if (key != NO_KEY)
  {
     if (m==1)
        lc.clearDisplay(0); 
     lc.setChar(0,m,key,false);
     num[m]=key;
     m = m-1;
     if (m < 0)
     {
          delay(500);
          number = ((num[1]-48)*10)+(num[0]-48);
          if (number == pw)
          {
            lc.setChar(0,7,'0',false);
            lc.setChar(0,6,'H',false);
            int dl = 350;
            int numnote;
            numnote = sizeof(melody)/2;  
            for (int i=0;i<numnote;i++) 
            {
              if (melody[i]>0)
                tone(buzzerpin, melody[i],dl*beats[i]);
              delay(dl*beats[i]);
              digitalWrite(buzzerpin,HIGH);
              delay(timestop);
            }
          }
          else if (number < pw)
          {
            lc.setChar(0,7,'P',false);
            lc.setChar(0,6,'P',false);
          }
          else if (number > pw)
          {
            lc.setChar(0,7,'L',false);
            lc.setChar(0,6,'L',false);
          }
          m = 1;
     }
  }

}

งานปฎิบัติที่ 8 งานโปรแกรมควบคุม Buzzer

รูปที่ 7.1 แสดงการออกแบบวงจร LED 7-Segment และ Buzzer
โค้ดที่7.1 (Code Arduino)
#include "LedControl.h"
#define C4  262
#define D4  294
#define E4  330
#define F4  349
#define G4  392
#define A4  440
#define B4  494
#define C5  523
int melody[] = {C4,D4,E4,F4,G4,A4,B4,C5};
float beats[] ={1,1,1,1,1,1,1,1};
int buzzerpin = 11;
int timestop = 70;
LedControl lc=LedControl(8,10,9,1); 
// Pin 8->DIN, 10->CLK, 9->CS(LOAD), 1 = No.of devices
void setup() 
{
  lc.shutdown(0,false);  
  lc.setIntensity(0,5); 
  lc.clearDisplay(0);
  int dl = 500;
  pinMode(buzzerpin,OUTPUT);
  int numnote;
  numnote = sizeof(melody)/2;  
  for (int i=0;i<numnote;i++) 
  {
    lc.setChar(0,7-i,'-',false);
    tone(buzzerpin, melody[i],dl*beats[i]);
    delay(dl*beats[i]);
    digitalWrite(buzzerpin,HIGH);
    delay(timestop);
  }
}
void loop() 
{
}


โค้ดที่7.2 (Code Arduino)
#include "LedControl.h"
#define C4  262
#define D4  294
#define E4  330
#define F4  349
#define FS4 370
#define G4  392
#define A4  440
#define B4  494
#define C5  523
#define D5  587
int melody[] = {D4,D4,E4,D4,G4,FS4,D4,D4,E4,D4,A4,G4,D4,D4,D5, 
  B4,G4,FS4,E4,C5,C5,B4,G4,A4,G4};
float beats[] ={0.5,0.5,1,1,1,2,0.5,0.5,1,1,1,2,0.5,0.5,1,1,
  1,1,1,0.5,0.5,1,1,1,2};
int buzzerpin = 11;
int timestop = 70;
LedControl lc=LedControl(8,10,9,1); 
// Pin 8->DIN, 10->CLK, 9->CS(LOAD), 1 = No.of devices
void setup() 
{
  lc.shutdown(0,false);  
  lc.setIntensity(0,5); 
  lc.clearDisplay(0);
  int dl = 400;
  pinMode(buzzerpin,OUTPUT);
  lc.setChar(0,7,'H',false);
  lc.setChar(0,6,'b',false);
  lc.setChar(0,5,'d',false);
  int numnote;
  numnote = sizeof(melody)/2;  
  for (int i=0;i<numnote;i++) 
  {
    tone(buzzerpin, melody[i],dl*beats[i]);
    delay(dl*beats[i]);
    digitalWrite(buzzerpin,HIGH);
    delay(timestop);
  }
}
void loop() 
{}


โค้ดที่7.3 (Code Arduino)
#include "LedControl.h"
#define C4  262
#define D4  294
#define E4  330
#define F4  349
#define G4  392
int melody[] = {E4,D4,C4,D4,E4,E4,E4,D4,D4,D4,E4,G4,G4,
                E4,D4,C4,D4,E4,E4,E4,D4,D4,E4,D4,C4};
float beats[] ={1,1,1,1,1,1,2,1,1,2,1,1,2,1,
                1,1,1,1,1,2,1,1,1,1,4};
int buzzerpin = 11;
int timestop = 70;
LedControl lc=LedControl(8,10,9,1); 
// Pin 8->DIN, 10->CLK, 9->CS(LOAD), 1 = No.of devices
void setup() 
{
  lc.shutdown(0,false);  
  lc.setIntensity(0,5); 
  lc.clearDisplay(0);
  int dl = 250;
  pinMode(buzzerpin,OUTPUT);
  int numnote;
  numnote = sizeof(melody)/2;  
  for (int i=0;i<numnote;i++) 
  {
    lc.setDigit(0,0,beats[i],false);
    tone(buzzerpin, melody[i],dl*beats[i]);
    delay(dl*beats[i]);
    digitalWrite(buzzerpin,HIGH);
    delay(timestop);
  }
}
void loop() 
{
}


งานปฏิบัติที่ 7 งานโปรแกรมรับค่า Keypad มาแสดงผลที่ LED 7-Segment

รูปที่ 6.1 แสดงการออกแบบวงจรรับค่า Keypad มาแสดงผลที่ LED 7-Segment
โค้ดที่ 6.1 (Code Arduino)


#include "LedControl.h"
#include "Keypad.h"
char keys[4][4]={
  {'7','8','9','A'},
  {'4','5','6','B'},
  {'1','2','3','C'},
  {'E','0','F','D'}};
byte rowPins[] = {7,6,5,4};
byte colPins[] = {3,2,1,0};
Keypad keypad = Keypad(makeKeymap(keys),rowPins,colPins,4,4);
LedControl lc=LedControl(8,10,9,1); 
// Pin 8->DIN, 10->CLK, 9->CS(LOAD), 1 = No.of devices
void setup() 
{
  lc.shutdown(0,false);  
  lc.setIntensity(0,5); 
  lc.clearDisplay(0);      
}
void loop() 
{
  char key = keypad.getKey();
  if (key != NO_KEY)
  {
    lc.setChar(0,0,key,false);
  }
}


โค้ดที่ 6.2 (Code Arduino)
#include "LedControl.h"
#include "Keypad.h"
char keys[4][4]={
  {'7','8','9','A'},
  {'4','5','6','B'},
  {'1','2','3','C'},
  {'*','0','#','D'}};
byte rowPins[] = {7,6,5,4};
byte colPins[] = {3,2,1,0};
Keypad keypad = Keypad(makeKeymap(keys),rowPins,colPins,4,4);
LedControl lc=LedControl(8,10,9,1); 
// Pin 8->DIN, 10->CLK, 9->CS(LOAD), 1 = No.of devices
int m=7;
void setup() 
{
  lc.shutdown(0,false);  
  lc.setIntensity(0,5); 
  lc.clearDisplay(0);      
}
void loop() 
{
  char key = keypad.getKey();
  if (key != NO_KEY)
  {
     if (m==7)
        lc.clearDisplay(0); 
     lc.setChar(0,m,key,false);
     m = m-1;
     if (m < 0)
        m = 7;
  }
}


โค้ดที่ 6.3 (Code Arduino)

#include "LedControl.h"
#include "Keypad.h"
char keys[4][4]={
  {'7','8','9','A'},
  {'4','5','6','B'},
  {'1','2','3','C'},
  {'*','0','#','D'}};
byte rowPins[] = {7,6,5,4};
byte colPins[] = {3,2,1,0};
Keypad keypad = Keypad(makeKeymap(keys),rowPins,colPins,4,4);
LedControl lc=LedControl(8,10,9,1); 
// Pin 8->DIN, 10->CLK, 9->CS(LOAD), 1 = No.of devices
int m=3;
char num[4]; //num[0] to num[3]
void setup() 
{
  lc.shutdown(0,false);  
  lc.setIntensity(0,5); 
  lc.clearDisplay(0);    
}
void loop() 
{
  char key = keypad.getKey();
  if (key != NO_KEY)
  {
     if (m==3)
        lc.clearDisplay(0); 
     lc.setChar(0,m,key,false);
     num[m]=key;
     m = m-1;
     if (m < 0)
     {
          if ((num[3]=='4')&&(num[2]=='0')&&(num[1]=='6')&&(num[0]=='9')) 
          {
            lc.setChar(0,7,'0',false);
            lc.setChar(0,6,'P',false);
          }
          else
          {
            lc.setChar(0,7,'-',false);
            lc.setChar(0,6,'-',false);
          }
          m = 3;
     }
  }
}


งานปฏิบัติที่ 6 งานโปรแกรมรับค่า Push Switch มาควบคุม LED แบบต่างๆ งานที่2

รูปที่5.2 แสดงการออกแบบวงจรรับค่า Push Switch มาควบคุม LED 7-Segment
โค้ด (Code Arduino)

#include "LedControl.h"
int count=0;
int sw = 2;
LedControl lc=LedControl(5,7,6,1);
// Pin 5->DIN, 7->CLK, 6->CS(LOAD), 1 = No.of devices

void show3digit(int num)
{
    int seg1,seg2,seg3;
    seg1 = (num%100)%10;
    seg2 = (num%100)/10;
    seg3 = num/100;
    lc.setDigit(0,0,seg1,false);
    if (num>=10)
        lc.setDigit(0,1,seg2,false);
    if (num>=100)
        lc.setDigit(0,2,seg3,false);
}
void setup()
{
    Serial.begin(9600);
    lc.shutdown(0,false);
    lc.setIntensity(0,5);
    lc.clearDisplay(0); 
    pinMode(sw,INPUT);
}

void loop()
{
    int x = digitalRead(sw);
    if (x==0)
    {
        delay(300);
        if (x==0)
        {
          count=count+1;
 if (count>999)
  count=0;
        }
    }
show3digit(count); 
Serial.print("count = ");Serial.println(count);
}


งานปฏิบัติที่ 5 งานโปรแกรมรับค่า Push Switch มาควบคุม LED แบบต่างๆ งานที่1


รูปที่5.1 แสดงการออกแบบวงจรรับค่า Push Switch มาควบคุม LED
โค้ด (Code Arduino)

int led = 13;
int sw = 2;
void setup()
{
  Serial.begin(9600);
  pinMode(led,OUTPUT);
  pinMode(sw,INPUT);     
}

void loop()
{
  int x;
  x = digitalRead(sw);
  Serial.print("x = ");Serial.println(x);
  digitalWrite(led,!x);
}

วันจันทร์ที่ 20 สิงหาคม พ.ศ. 2561

โปรเจค งานที่ 12 เครื่องชาร์จอัจฉริยะสำหรับแบตเตอรี่แบบชาร์จไฟ NiMH ขนาด 9 V. V1 © GPL3 + เครื่องชาร์จประจุไฟฟ้าสถิตแบบสมาร์ทที่ผ่านการควบคุมสำหรับแบตเตอรี่ชาร์จ NiMH ขนาด 9V

เครื่องชาร์จอัจฉริยะสำหรับแบตเตอรี่แบบชาร์จไฟ NiMH ขนาด 9 V. V1 © GPL3 +

เครื่องชาร์จประจุไฟฟ้าสถิตแบบสมาร์ทที่ผ่านการควบคุมสำหรับแบตเตอรี่ชาร์จ NiMH ขนาด 9V
ส่วนประกอบและวัสดุสิ้นเปลือง

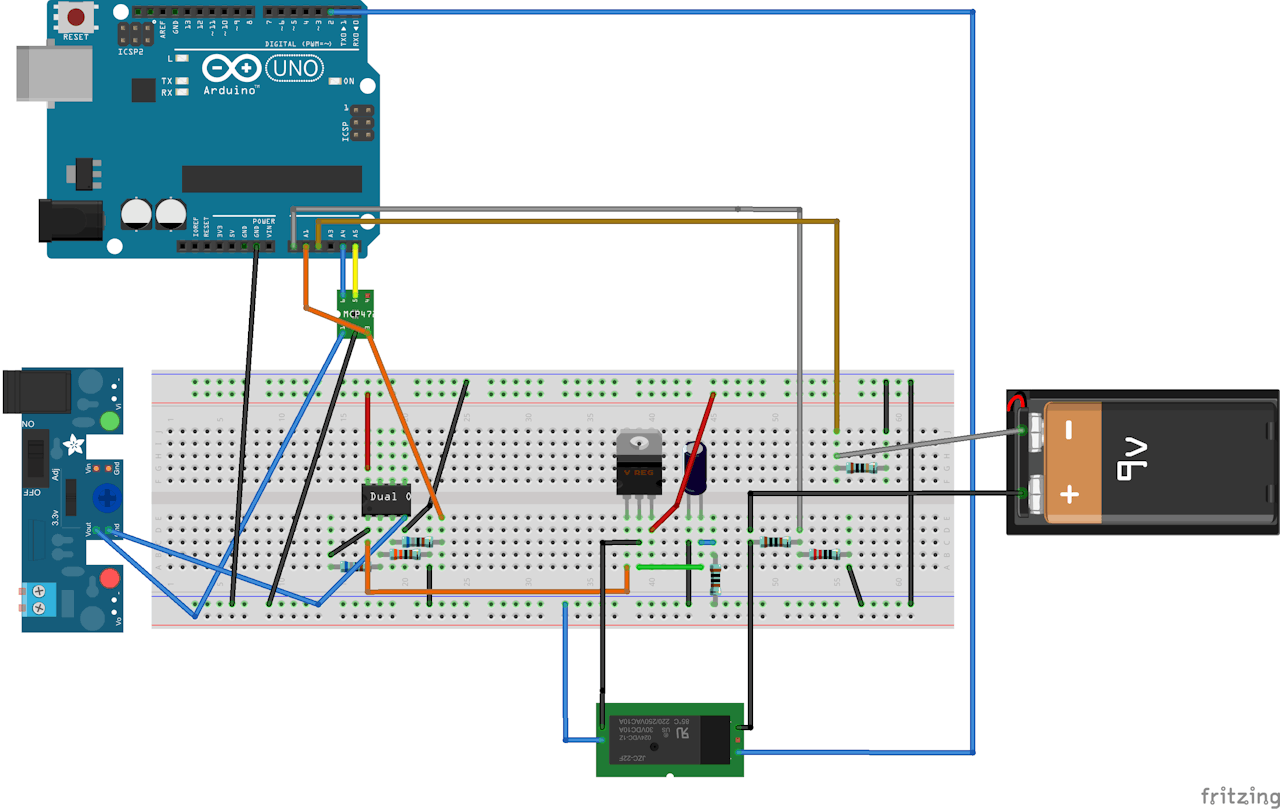
ฉันใช้ YwRobot I2C SERIAL LCD 1602 MODULE เพื่อแสดงสถานะของอุปกรณ์ชาร์จ แต่สามารถใช้โมดูล LCD I2C แบบควบคุมอื่น ๆ ได้ ดูเหมือนว่าโมดูล YwRobot LCD ไม่ได้รับการสนับสนุนจากไลบรารี LiquidCrystal_I2C มาตรฐานดังนั้นฉันจึงใช้ไลบรารี LiquidCrystal ใหม่หากคุณใช้โมดูล LCD ที่แตกต่างกันคุณจะต้องเปลี่ยนบรรทัดนี้:
LiquidCrystal_I2C lcd(0x27, 2, 1, 0, 4, 5, 6, 7, 3, POSITIVE);  // set the LCD address to 0x27 for a 16 chars and 2 line display
ในการแปลงดิจิตอลเป็นอนาล็อกและแอลซีดีฉันใช้ SparkFun Breadboard Power Supply 5V / 3.3V อาจเป็นไปได้ที่จะใช้ 5V จากบอร์ด Arduino
นอกจากนี้คุณยังต้องจ่ายไฟ 17 โวลต์ หากคุณไม่มีแหล่งจ่ายไฟคุณสามารถใช้ตัวแปลง DC / DC แบบปรับได้เช่นนี้
target_current_mA - กระแสประจุไฟฟ้าคงที่
max_time_for_trickle_charge - จำนวนนาทีสูงสุดสำหรับการชาร์จไฟแบบหยดสามารถตั้งค่าได้สูงสุด 600 (10 ชั่วโมง)
battery_nominal_capacity_mA - ความจุแบตเตอรี่ที่ใช้คำนวณกระแสหยด
โดยทั่วไปการชาร charging จไฟจะขึ้นอยู่กับความจุที่ระบุ สำหรับแบตเตอรี่ที่มีกำลังการผลิตน้อยที่สุดคือกระแสไฟฟ้าสูงสุด 170mAh คือ 170mA กระแสประจุกระแสไฟต่ำสุดคือ C / 10 - 17mA สำหรับแบตเตอรี่ 170mAh
หลังจากชาร์จไฟแล้วเครื่องชาร์จจะตรวจสอบว่าต่อแบตเตอรี่หรือไม่ หากแบตเตอรี่ที่ต่ออยู่กับแบตเตอรี่จะถูกชาร์จด้วยกระแสไฟฟ้าที่กำหนดไว้จนกว่าจะชาร์จจนเต็ม การชาร์จไฟสิ้นสุดลงโดยตรวจจับค่า dV / dt เป็นลบในช่วง 5 นาที หลังจากชาร์จเครื่องชาร์จเสร็จแล้วจะเปลี่ยนไปใช้การชาร์จด้วยกระแส C / 40 เครื่องชาร์จจะตัดการเชื่อมต่อตัวเองจากแบตเตอรี่หลังจากหมดเวลาการชาร์จไฟสูงสุด
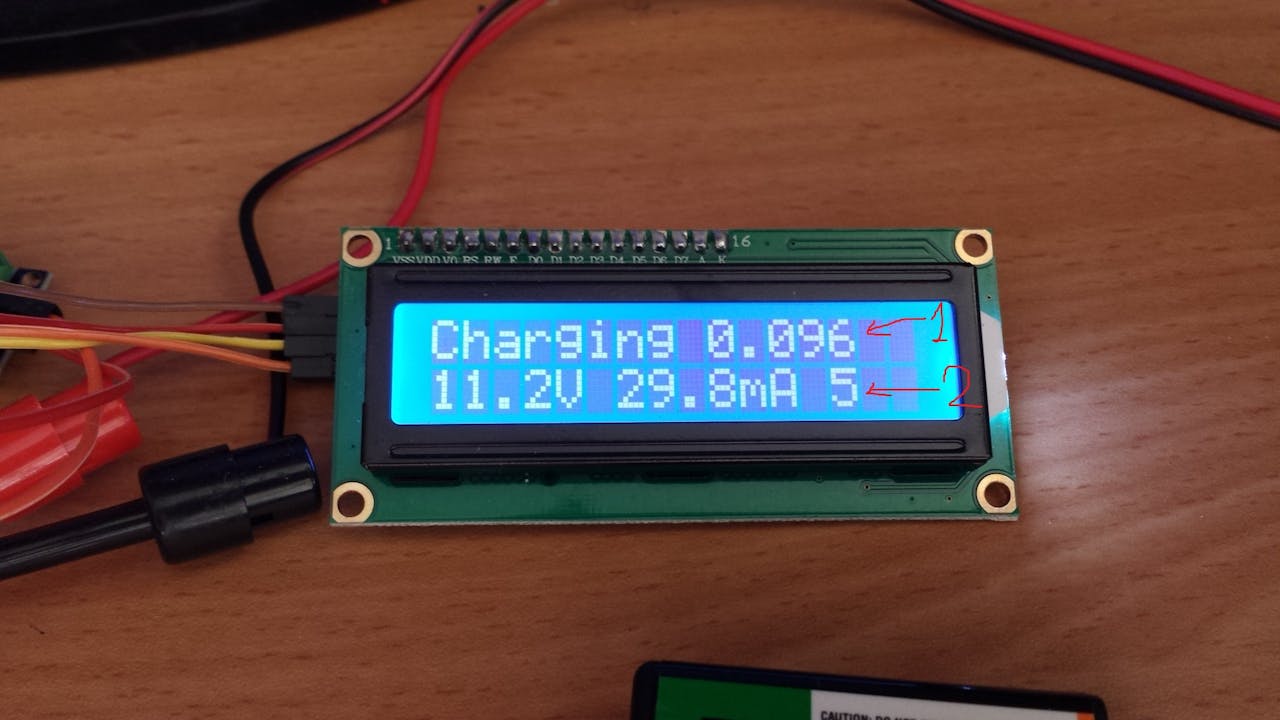
1 - dV / dt
2 - ชาร์จไฟเป็นนาที
หน้าจอที่ 2


หน้าจอที่ 3
1 - เวลาในการชาร์จ
2 - ชาร์จแบตเตอรี่
ข้อมูลเพิ่มเติมเกี่ยวกับแบตเตอรี่ NiMH:

 สำหรับการชาร์จแบตเตอรี่ NiMH 9V 
// แบตเตอรี่สามารถมีได้ 6,7 หรือ 8 เซลล์
1.25 โวลต์// ทำให้แรงดันไฟฟ้าระหว่าง 7.5 ถึง 10V 
# รวม<Wire.h>
 
#include  <LiquidCrystal_I2C.h>
#include  <TimeLib.h>
#include  <TimerOne.h>
#include  <elapsedMillis.h>

LiquidCrystal_I2C  lcd ( 0x27 ,  2 ,  1 ,  0 ,  4 ,  5 ,  6 ,  7 ,  3 ,  เป็นบวก);   // ตั้งค่าที่อยู่ LCD เป็น 0x27 สำหรับตัวอักษร 16 ตัวและการแสดงผล 2 บรรทัด
// ฮาร์ดแวร์ defenitions # ระบุ MCP4725_ADDR 0x60 // ที่อยู่ DAC # กำหนด DAC_REF_VOLTAGE 5.0 # define CHARGE_RELAY_PIN 2 # กำหนด DISCONNECT_CHARGE_RELAY HIGH # define CONNECT_CHARGE_RELAY LOW # กำหนด CURRENT_SENSIST_SESISTOR_PIN A2 #define CURRENT_SENSING_SESISTOR 10.2 // OHm


#define BATTERY_VOLTAGE_PIN A0 
# กำหนด R1 5090 // รีซิสเตอร์ด้านแรงดันไฟฟ้าต่ำตรวจจับ
# กำหนด R2 19910 // รีซิสเตอร์ด้านสูงของเครื่องตรวจจับแรงดันไฟฟ้า
# กำหนด ADC_REF_VOLTAGE 4.89 // แรงดันไฟฟ้า Arduino จริงหรือแรงดันไฟฟ้า AREF สำหรับ ADC ที่เหมาะสมสำหรับการแปลแรงดันไฟฟ้า
# กำหนด R3 3300.0 
# 
กำหนดR4 6800.0 # กำหนด AMP_GAIN (1 + R4 / R3) 
// คำจำกัดความต่าง ๆ// # define MINIMUM_VOLTAGE 8.1 / แรงดันต่ำสุดหลังจากควบคุม# กำหนด BATTERY_GOOD_VOLTAGE_THRESHOLD 7.0 # ระบุ MAXIMIM_ALLOWED_CURRENT 200 // กระแสไฟแบตเตอรี่สูงสุดที่สามารถใช้งานได้ mA (ยาก cut-off) #define MAXIMUM_BATTERY_VOLTAGE 15.0 // แรงดันไฟฟ้าแบตเตอรี่สูงสุดที่อนุญาต V (ตัดยาก)


#define VOLTAGE_STEP 0.001 // ขั้นตอนสำหรับการควบคุมแรงดันไฟฟ้า
# 
กำหนดPOINTS_FOR_AVERAGING 100 // จำนวนจุดที่ใช้สำหรับการเฉลี่ย# กำหนด MEASURE2MEASURE_US 5000 // เวลาระหว่างการวัดเป็นหน่วยเป็นมิลลิวินาที (ต้องมากกว่า 200 ครั้งเนื่องจากมีการอ่านแบบอนาล็อกสองอัน) 
#define VOLTAGE_LOG_TIME_MIN 30.0 / / เวลาเป็นนาทีเพื่อประหยัดแรงดันไฟฟ้าสำหรับ dV / dT cutoff 
# กำหนด MINUTES_TO_LOG 5 
# กำหนด TRICKLE_CURRENT_RATIO 40 
// สถานะเครื่องชาร์จ# กำหนดการเริ่มต้น 0 # ระบุ NO_BATTERY 5 # กำหนด BATTERY_CONNECTED 10 # กำหนด BATTERY_VOLTAGE_LOW 15 # กำหนด CURRENT_RAMP_UP 20 #define CHARGING 30 #define CURRENT_RAMP_DOWN 32 # กำหนด TRICKLE 35


#define END_OF_TRICKLE 37 
#define UNEXPECTED_CURRENT_FALL 40 
#define UNABLE_TO_REACH_CURRENT 60 
#define FULLY_CHARGED 70 
#define CURRENT_TOO_HIGH 80 
#define REGULATION_FAILED 90 
#define กระแสเกิน 100 
overvoltage #define 101 
#define FINAL_STATE 200 
/// unsigned int voltage_readings [ POINTS_FOR_AVERAGING ] current_sensing_resistor_readings [ POINTS_FOR_AVERAGING ] , averaging_index ; // สำหรับค่าเฉลี่ยระยะยาวที่ไม่มีการลงชื่อint voltage_sum , current_sum ; // ผลรวมของลอยโดยเฉลี่ย


 regulator_voltage_code , resistor_voltage , csr_voltage_code , regulator_voltage , current_mA , แบตเตอรี่แรงดันไฟฟ้า; // หน่วยวัด
ลอย tmp_resistor_voltage , tmp_current_mA , tmp_regulator_voltage , tmp_battery_voltage ; 
int  i , j , charger_state ; 
สั้น unsigned  int  last_second , lcd_last_second , log_last_second ; 
สายอักขระ lcd_last_string1 ,lcd_last_string2 ; 
สายอักขระ empty_string = "" ; 
ข้อความสตริง , eoc_line1 , eoc_line2 ; 
unsigned  char  sec_index , min_index ; 
// long ยาว int charging_started; 
float  sec_log [ 60 ], min_log [ MINUTES_TO_LOG ], last_blf ; 
ลอย trickle_current_mA ; 
int  total_minutes_average = 0 ; 
elapsedMillis ChargingTimeMillis ,
 TrickleChargingTimeMillis ; 
float wanted_dac_voltage = 0 ; float last_dac_voltage = 0 ; // ข้อความconst char msg_battery_detected [] PROGMEM = "ตรวจพบแบตเตอรี่" ; const char msg_no_battery [] PROGMEM = "ไม่มีแบตเตอรี่" ; const char msg_battery_ok [] PROGMEM = "แบตเตอรี่ตกลง" ; const char msg_voltage_too_low [] PROGMEM =


     "แรงดันแบตเตอรี่ต่ำเกินไป" ; 
const  char  msg_voltage_too_low_short []  PROGMEM  = "V แบตเตอรี่ต่ำ" ; 
const  char  msg_ramp_up []  PROGMEM     = "ตั้งขึ้น" ; 
const  char  msg_charging []  PROGMEM     = "กำลังชาร์จ" ; 
const  char  msg_space []  PROGMEM      = "" ; 
const  char  msg_ramp_down []  PROGMEM     = "ลาดลง" ;
  []  PROGMEM    = "ค่าใช้จ่ายเล็กน้อย" ; 
const  char  msg_no_current []  PROGMEM     = "ไม่มีปัจจุบัน" ; 
const  char  msg_current_unreachable []  PROGMEM  = "ฉันไม่สามารถติดต่อได้" ; 
const  char  msg_current_unreachable_long []  PROGMEM  = "ไม่สามารถเข้าถึงกระแสไฟที่ต้องการ" ; 
const  char  msg_completed []  PROGMEM     = "เสร็จสิ้น" ; 
const  char  msg_charge []  PROGMEM      ="ค่า" ; 
const  char  msg_high_current []  PROGMEM    = "กระแสไฟสูง" ; 
const  char  msg_regulating_fault []  PROGMEM   = "ข้อบังคับ" ; 
const  char  msg_overcurrent []  PROGMEM    = "ปัจจุบันสูงเกินไป" ; 
const  char  msg_overvoltage []  PROGMEM    = "แรงดันสูงเกินไป" ; 
const  char  msg_trickle_completed []  PROGMEM   = "Trickle เสร็จสิ้น" ;

// *************************** พารามิเตอร์การชาร์จ ******************* ********************** 
// ************************** ************************************************** ************* 
float  target_current_mA = 30 ;     // การชาร์จกระแส mA แบบ mA 
float  battery_nominal_capacity_mA = 170 ;  / ความจุที่กำหนดของแบตเตอรี่ mA 
float  max_time_for_trickle_charge = 6 ;   // เวลาการหยดน้ำสูงสุดในนาที
// **************************************** ************************************************* 
/ / ************************************************* **************************************** 
struct
 ทุกวัน { 
unsigned char hours ; นาทีถ่านที่ไม่ได้ลงชื่อ; unsigned int total_minutes ; } elapsed_time ; การตั้งค่าเป็นโมฆะ() { pinMode ( CHARGE_RELAY_PIN , OUTPUT ); disconnect_charging_circuit (); // ชาร์จแบตเตอรี่ ftom ยกเลิกการเชื่อมต่อสายไฟ เริ่มต้น(); // I2C dac_write_voltage ( 0 ); // ตรวจสอบว่าเป็นไปได้ที่ต่ำกว่าชุดปัจจุบันอนุกรม เริ่มต้น(      


 115200 ); 
last_second = second (); lcd_last_second = วินาที(); log_last_second = วินาที(); Timer1 . เริ่มต้น( MEASURE2MEASURE_US ); // จะใช้ในการวัดแรงดันและกระแสของแบตเตอรี่ (ไมโคร) Timer1 attachInterrupt ( read_hw ); / / ยึด read_hw () เป็นตัวจับเวลาล้น interrupt averaging_index = 0 ; sec_index = 0 ; min_index = 0 ; charger_state 


 = 0 ; / / สถานะเริ่มต้นของเครื่องรัฐ
wanted_dac_voltage = 0 ; // ทำให้แรงดันต่ำสุดของ shure last_blf = 1.0 ; trickle_current_mA = battery_nominal_capacity_mA / TRICKLE_CURRENT_RATIO ; // ChargingTimeMillis = 0; // จอแอลซีดีแอลซีดี เริ่มต้น( 16 , 2 ); จอแอลซีดี backlight (); จอแอลซีดี clear (); update_lcd ( F ( "เปิดเครื่อง ... " ), empty_string 


 ); 
ความล่าช้า( 1000 ); } float log_battery_voltage () ( / / เข้าสู่ระบบเพียงครั้งเดียวต่อวินาทีถ้า( log_last_second == วินาที()) return last_blf ; อื่นlog_last_second = วินาที(); sec_log [ sec_index ] = battery_voltage ; if ( sec_index < 59 ) { sec_index ++ ; } else { // ถ้ามีการบันทึกหนึ่งนาที 


  // คำนวณจำนวนนาทีต่อหนึ่งนาที
หาก( min_index > = MINUTES_TO_LOG ) min_index = 0 ; sec_index = 0 ; float sum_v = 0 ; สำหรับ( i = 0 ; i < 60 ; i ++ ) { sum_v + = sec_log [ i ]; } float min_average = sum_v / 60.0 ; สำหรับ( i = 1 ;    


  i < MINUTES_TO_LOG ; i ++ )  min_log [ i - 1 ] = min_log [ i ]; 
min_log [ MINUTES_TO_LOG - 1 ] = min_average ; // บันทึกนาทีเฉลี่ย//Serial.print(min_index); //Serial.print (""); //Serial.print(min_average); //Serial.print ("arr:"); //Serial.print(min_log[0]); //Serial.print (""); //Serial.print(min_log[1]); //Serial.print (""); //Serial.print(min_log[2]); //Serial.print ("");  


  //Serial.print(min_log[3]); 
//Serial.print (""); //Serial.print(min_log[4]); last_blf = best_linear_fit ( min_log ); //Serial.print("Slope "); //Serial.println(last_blf); min_index ++ ; total_minutes_average ++ ; } return last_blf ; }  


งานครั้งที่ 5 ในสถานที่ฝึกงานของ นศ ใช้ระบบควบคุณภาพอย่างไร

มาตรฐาน ISO 9001 ISO 9001 เป็นมาตรฐานสากลที่องค์กรธุรกิจทั่วโลกให้ความสำคัญ เพื่อความเป็นเลิศทางด้านคุณภาพ และความมีประสิทธิภาพของการด...